It is easy to amend a Patient Appointment and the Diary for the days shown on screen.
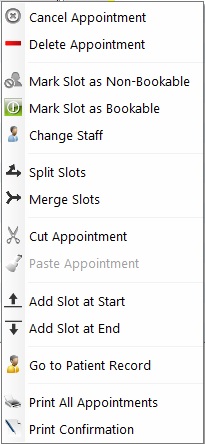
When you Right-click within the diary, the menu shown below comes up.
 |
When Cancel Appointment is selected, a box will be displayed asking for a cancellation reason. Enter the reason and press Save. This will be stored in the patient record under “Preferences”, and shown when an appointment is booked in the future. You also have the option to put the slots back to how they were originally.
You may also have a “Delete Appointment” option. When Delete Appointment is selected, a box will be displayed asking if you are sure you wish to delete the appointment. Delete is normally used for “in-house” errors or updates, whilst cancellations are noted on the Patient Record. You also have the option to put the slots back to how they were originally.
A slot can be marked as Non-Bookable if required, for example for Staff Training, a Fire Drill etc. Right-click, choose “Mark Slot as Non-Bookable” and select a reason from the box which appears. Reasons shown can be modified in the How Do I Build My Diary? section of setup.
A slot can be marked as Bookable again if it was previously changed, just right-click on the slot and select the option.
You can select Change Staff to update that specific appointment to another Optom / staff member. It will bring up a box where you can choose the new staff member from a list. You cannot change the staff member on old appointments.
With Split Slots, an (e.g.) 30 minute appointment can be made into a 20 then 10, 15 then 15 etc. Default is 50% - 50%. A box will show the original slot and using the boxes / arrows you can choose the split of the resulting slots. You can now split into a number of slots, or a number of minutes.
With Merge Slots, individual slots can be made into one larger appointment. Hold down the Ctrl key and single left click the slots to merge, release Ctrl then right click and choose Merge Slots. It will ask you if you are sure you want to Merge? Choose.
If you wish to move an appointment, the Cut & Paste Appointment functions can be used. Right-click Cut, find the new desired appointment time, Right-click Paste. This action may take a second or two to complete. When cutting and pasting an appointment, the staff details of the person who carried
out the action are stored and displayed on the appointment tooltip. An entry is also made in the System Audit File
Add Slot at Start creates a new, default length appointment at the start of the day.
Add Slot at End creates a new, default length appointment at the end of the day.
Go to Patient Record will open up the record of the selected patient.
You can print the A4 “clinic” by pressing “Print All Appointments”.
You can also click “Print Confirmation” and a slip for the appointment time you selected will print if you have a receipt printer (otherwise it goes to your A4 printer) You can check Printer settings in How Do I Set Up Printers?
|
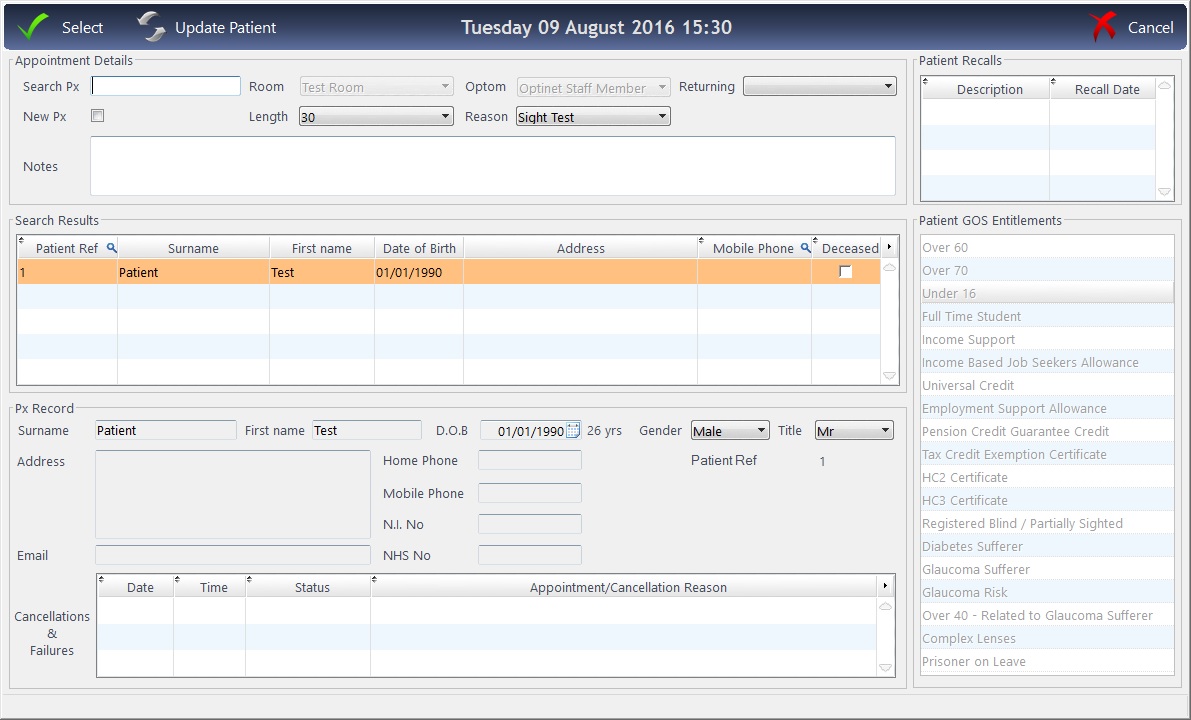
When you double left-click on a slot, the window below comes up:

From here, appointment information, such as the Reason can be updated. To update the length of an already booked appointment, please use the Split / Merge facility under the right-click menu.
The Patient Record can also now be directly updated from this screen. Press Update Patient to do this.
When you are happy, press Save


 How Do I Modify an Appointment?
