Welcome to the Optinet FLEX Training Portal. Call us on 0845 313 0233 / 01684 577 900.
 How Do I Make Appointments Available Online?
In FLEX, you will need to choose which Appointment Reasons are available to book online. Go to Menu – Setup – Appointments - General. Click the ‘Next’ button twice to get to the Appointment Reasons (page 3 of 5 in the wizard).
Here, right click any one of the appointments and choose ‘Allow to be booked online’. You can do the same again to Remove from Online Booking. A green box will appear in the last column of the table; this indicates that the reason has been made available.
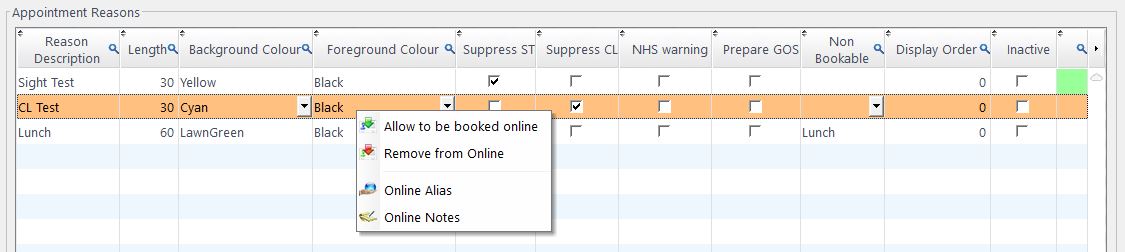
The other options in the right click menu are:
Online Alias: how the appointment appears to Patients. For example, in Flex, 'Private ST' and 'NHS ST' can appear as 'Sight Exam' if that is its Online Alias, removing confusion for patients about what they need to request.
Online Notes: notes which appear when the appointment reason is chosen. Usually, this is used for marketing purposes. For example, you could add, 'Why not consider an OCT for just £x….'
Once you have set up the appointment reasons you wish to be online, you will then need to tell the Diary which timeslots you want to make available. You can make as many or as little as you wish available, and this can be done at your leisure.
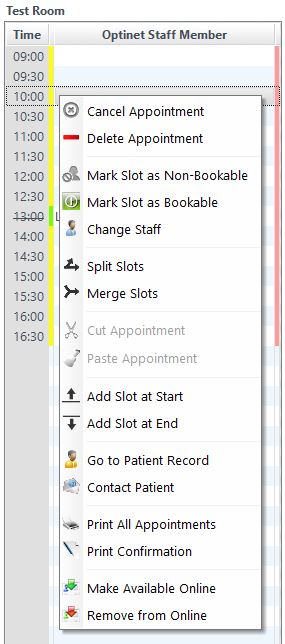
To do this, right click on a time slot. As with the appointment reasons, you can choose to Make Available Online (and of course Remove from Online). Once an appointment slots has been made available, a green line will appear to the right of the chosen slot/s. If they have a red line, then it means that slot/s is not available for online booking.